In this lab, we introduce two datasets, MNIST and CIFAR, then we will talk about how to implement CNN models for these two datasets using tensorflow. The major difference between mnist and cifar is their size. Due to the limit of memory size and time issue, we offer a guide to illustrate typical input pipeline of tensorflow. Let's dive into tensorflow!
import warnings
import os
warnings.filterwarnings("ignore")
os.environ['TF_CPP_MIN_LOG_LEVEL'] = '2'
import tensorflow as tf
from tensorflow.keras import utils, datasets, layers, models
import matplotlib.pyplot as plt
import numpy as np
gpus = tf.config.experimental.list_physical_devices('GPU')
if gpus:
try:
# Currently, memory growth needs to be the same across GPUs
for gpu in gpus:
tf.config.experimental.set_memory_growth(gpu, True)
tf.config.experimental.set_visible_devices(gpus[2], 'GPU')
logical_gpus = tf.config.experimental.list_logical_devices('GPU')
print(len(gpus), "Physical GPUs,", len(logical_gpus), "Logical GPUs")
except RuntimeError as e:
# Memory growth must be set before GPUs have been initialized
print(e)
4 Physical GPUs, 1 Logical GPUs
We start from a simple dataset. MNIST is a simple computer vision dataset. It consists of images of handwritten digits like:
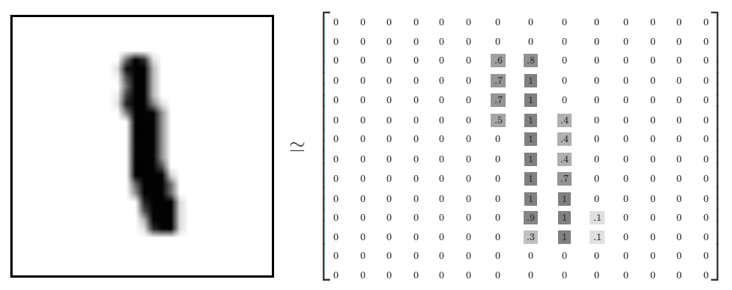
It also includes labels for each image, telling us which digit it is. For example, the labels for the above images are 5, 0, 4, and 1. Each image is 28 pixels by 28 pixels. We can interpret this as a big array of numbers:
The MNIST data is hosted on Yann LeCun's website. We can directly import MNIST dataset from Tensorflow.
# Download and prepare the MNIST dataset
(train_images, train_labels), (test_images, test_labels) = datasets.mnist.load_data()
# Normalize pixel values to be between 0 and 1
train_images, test_images = train_images / 255.0, test_images / 255.0
print('shape of train_images:', train_images.shape)
print('shape of train_labels:', train_labels.shape)
shape of train_images: (60000, 28, 28) shape of train_labels: (60000,)
Before jumping to Convolutional Neural Network model, we're going to start with a very simple model with a single layer and softmax regression.
We know that every image in MNIST is a handwritten digit between zero and nine. So there are only ten possible digits that a given image can be. We want to give the probability of the input image for being each digit. That is, input an image, the model outputs a ten-dimension vector.
This is a classic case where a softmax regression is a natural, simple model. If you want to assign probabilities to an object being one of several different things, softmax is the thing to do.
# flating the training data for dense layers
train_images_1 = train_images.reshape((60000, -1))
test_images_1 = test_images.reshape((10000, -1))
print(train_images_1.shape)
print(test_images_1.shape)
(60000, 784) (10000, 784)
model_1 = models.Sequential()
model_1.add(layers.Dense(10, activation='softmax',input_shape=(784,)))
model_1.summary()
Model: "sequential" _________________________________________________________________ Layer (type) Output Shape Param # ================================================================= dense (Dense) (None, 10) 7850 ================================================================= Total params: 7,850 Trainable params: 7,850 Non-trainable params: 0 _________________________________________________________________
# compile the model and train it for 5 epochs
model_1.compile(optimizer='adam',
loss='sparse_categorical_crossentropy',
metrics=['accuracy'])
model_1.fit(train_images_1, train_labels, epochs=5)
Epoch 1/5 1875/1875 [==============================] - 6s 3ms/step - loss: 0.4760 - accuracy: 0.8762 Epoch 2/5 1875/1875 [==============================] - 5s 3ms/step - loss: 0.3044 - accuracy: 0.9157 Epoch 3/5 1875/1875 [==============================] - 5s 3ms/step - loss: 0.2839 - accuracy: 0.9216 Epoch 4/5 1875/1875 [==============================] - 5s 3ms/step - loss: 0.2733 - accuracy: 0.9240 Epoch 5/5 1875/1875 [==============================] - 5s 3ms/step - loss: 0.2671 - accuracy: 0.9251
<keras.callbacks.History at 0x7f12ec57bd60>
_, test_acc_1 = model_1.evaluate(test_images_1, test_labels, verbose=0)
print('Testing Accuracy : %.4f'%test_acc_1)
Testing Accuracy : 0.9247
From the above result, we got about 92.4% accuracy for Softmax Regression on MNIST. In fact, it's not so good. This is because we're using a very simple model.
We're now jumping from a very simple model to something moderately sophisticated: a small Convolutional Neural Network. This will get us to over 99% accuracy, not state of the art, but respectable.
# reshaping the training data to 3 dimensions
train_images_2 = train_images.reshape((60000, 28, 28, 1))
test_images_2 = test_images.reshape((10000, 28, 28, 1))
print(train_images_2.shape)
print(test_images_2.shape)
(60000, 28, 28, 1) (10000, 28, 28, 1)
As input, a CNN takes tensors of shape (image_height, image_width, color_channels), ignoring the batch size. If you are new to color channels, MNIST has one (because the images are grayscale), whereas a color image has three (R,G,B). In this example, we will configure our CNN to process inputs of shape (28, 28, 1), which is the format of MNIST images. We do this by passing the argument input_shape to our first layer.
#The 6 lines of code below define the convolutional base using a common pattern: a stack of Conv2D and MaxPooling2D layers.
model_2 = models.Sequential()
model_2.add(layers.Conv2D(32, (3, 3), strides=(1,1), padding='valid', activation='relu', input_shape=(28, 28, 1)))
model_2.add(layers.MaxPooling2D((2, 2)))
model_2.add(layers.Conv2D(64, (3, 3), strides=(1,1), padding='valid', activation='relu'))
model_2.add(layers.MaxPooling2D((2, 2)))
model_2.add(layers.Conv2D(64, (3, 3), strides=(1,1), padding='valid', activation='relu'))
Let's display the architecture of our model so far.
model_2.summary()
Model: "sequential_1" _________________________________________________________________ Layer (type) Output Shape Param # ================================================================= conv2d (Conv2D) (None, 26, 26, 32) 320 max_pooling2d (MaxPooling2D (None, 13, 13, 32) 0 ) conv2d_1 (Conv2D) (None, 11, 11, 64) 18496 max_pooling2d_1 (MaxPooling (None, 5, 5, 64) 0 2D) conv2d_2 (Conv2D) (None, 3, 3, 64) 36928 ================================================================= Total params: 55,744 Trainable params: 55,744 Non-trainable params: 0 _________________________________________________________________
Above, you can see that the output of every Conv2D and MaxPooling2D layer is a 3D tensor of shape (height, width, channels). The width and height dimensions tend to shrink as we go deeper in the network. The number of output channels for each Conv2D layer is controlled by the first argument (e.g., 32 or 64). Typically, as the width and height shrink, we can afford (computationally) to add more output channels in each Conv2D layer.
To complete our model, we will feed the last output tensor from the convolutional base (of shape (3, 3, 64)) into one or more Dense layers to perform classification. Dense layers take vectors as input (which are 1D), while the current output is a 3D tensor. First, we will flatten (or unroll) the 3D output to 1D, then add one or more Dense layers on top. MNIST has 10 output classes, so we use a final Dense layer with 10 outputs and a softmax activation.
To reduce overfitting, we will apply dropout before the readout layer. The idea behind dropout is to train an ensemble of model instead of a single model. During training, we drop out neurons with probability $p$, i.e., the probability to keep is $1-p$. When a neuron is dropped, its output is set to zero. These dropped neurons do not contribute to the training phase in forward pass and backward pass. For each training phase, we train the network slightly different from the previous one. It's just like we train different networks in each training phrase. However, during testing phase, we don't drop any neuron, and thus, implement dropout is kind of like doing ensemble. Also, randomly drop units in training phase can prevent units from co-adapting too much. Thus, dropout is a powerful regularization techique to deal with overfitting.
model_2.add(layers.Flatten())
model_2.add(layers.Dense(64, activation='relu'))
model_2.add(layers.Dropout(0.5))
model_2.add(layers.Dense(10, activation='softmax'))
Here's the complete architecture of our model.
model_2.summary()
Model: "sequential_1" _________________________________________________________________ Layer (type) Output Shape Param # ================================================================= conv2d (Conv2D) (None, 26, 26, 32) 320 max_pooling2d (MaxPooling2D (None, 13, 13, 32) 0 ) conv2d_1 (Conv2D) (None, 11, 11, 64) 18496 max_pooling2d_1 (MaxPooling (None, 5, 5, 64) 0 2D) conv2d_2 (Conv2D) (None, 3, 3, 64) 36928 flatten (Flatten) (None, 576) 0 dense_1 (Dense) (None, 64) 36928 dropout (Dropout) (None, 64) 0 dense_2 (Dense) (None, 10) 650 ================================================================= Total params: 93,322 Trainable params: 93,322 Non-trainable params: 0 _________________________________________________________________
As you can see, our (3, 3, 64) outputs were flattened into vectors of shape (576) before going through two Dense layers.
model_2.compile(optimizer='adam',
loss='sparse_categorical_crossentropy',
metrics=['accuracy'])
model_2.fit(train_images_2, train_labels, epochs=5)
Epoch 1/5 1875/1875 [==============================] - 13s 6ms/step - loss: 0.2574 - accuracy: 0.9211 Epoch 2/5 1875/1875 [==============================] - 11s 6ms/step - loss: 0.0870 - accuracy: 0.9754 Epoch 3/5 1875/1875 [==============================] - 11s 6ms/step - loss: 0.0650 - accuracy: 0.9827 Epoch 4/5 1875/1875 [==============================] - 11s 6ms/step - loss: 0.0492 - accuracy: 0.9863 Epoch 5/5 1875/1875 [==============================] - 11s 6ms/step - loss: 0.0411 - accuracy: 0.9880
<keras.callbacks.History at 0x7f12ec370a00>
_, test_acc_2 = model_2.evaluate(test_images_2, test_labels, verbose=0)
print('Testing Accuracy : %.4f'%test_acc_2)
Testing Accuracy : 0.9902
As you can see, our simple CNN has achieved a test accuracy of 99%. Not bad for a few lines of code! For another style of writing a CNN (using the Keras Subclassing API and a GradientTape) head here.
Actually MNIST is a easy dataset for the beginner. To demonstrate the power of Neural Networks, we need a larger dataset CIFAR-10.
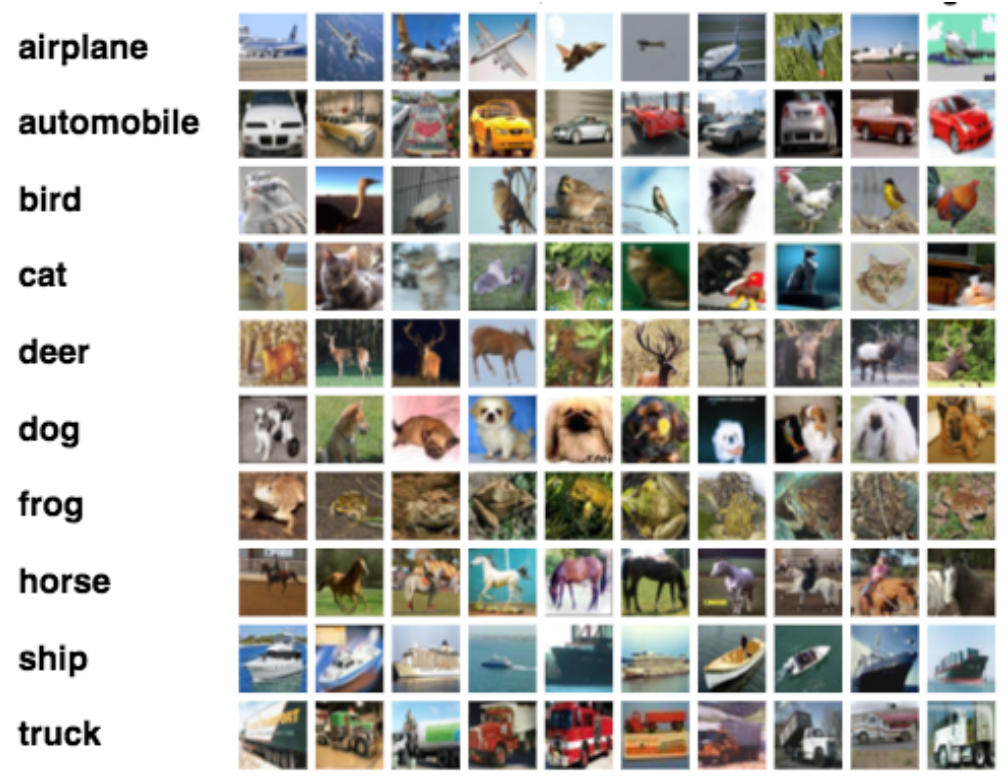
CIFAR-10 consists of 60000 32x32 color images in 10 classes, with 6000 images per class. There are 50000 training images and 10000 test images. Here are the classes in the dataset, as well as 10 random images from each: