GAN


Shan-Hung Wu & DataLab
Fall 2023

In this lab, we are going to introduce an unsupervised learning model: Generative adversarial network(GAN)

GAN has two main components in the model, generator and discriminator. Discriminator tries to discriminate real data from generated data and generator tries to generate real-like data to fool discriminator. The training process alternates between optimizing discriminator and optimizing generator. As long as discriminator was smart enough, it can lead generator to go toward the manifold of real datas.

In [8]:
%matplotlib inline

import numpy as np
import matplotlib.pyplot as plt
import os
os.environ['TF_CPP_MIN_LOG_LEVEL'] = '2' # disable warnings and info
import tensorflow as tf
import tensorflow.keras as keras
import imageio
import moviepy.editor as mpy

SAMPLE_COL = 16
SAMPLE_ROW = 16
SAMPLE_NUM = SAMPLE_COL * SAMPLE_ROW

IMG_H = 28
IMG_W = 28
IMG_C = 1
IMG_SHAPE = (IMG_H, IMG_W, IMG_C)

BATCH_SIZE = 5000
Z_DIM = 128
BZ = (BATCH_SIZE, Z_DIM)
BUF = 65536

DC_LR = 2.5e-04
DC_EPOCH = 256

W_LR = 2.0e-04
W_EPOCH = 256
WClipLo = -0.01
WClipHi = 0.01
In [ ]:
gpus = tf.config.experimental.list_physical_devices('GPU')
tf.config.experimental.set_memory_growth(gpus[0], True)
tf.config.experimental.set_virtual_device_configuration(gpus[0], [tf.config.experimental.VirtualDeviceConfiguration(memory_limit = 10000)])

DCGAN

DCGAN is short for Deep Convolutional Generative Adversarial Networks. It is a paper that doing well on image task, its architecture increase training stability and quality of generated sample. In this lab, we will modify the code of DCGAN and demo the training of DCGAN on MNIST dataset.

Some suggestions in DCGAN(referenced from paper):

  • Replace any pooling layers with strided convolutions (discriminator) and fractional-strided convolutions (generator).
    • Each convolutional layer halved the feature maps resolution. (Not hard requirement.)
  • Use batch normalization in both the generator and the discriminator.
    • The batch normalization here is the simplest one just normalizing the feature activations.
    • Do not use batch normalization in the last few layers in generator, since it may make it difficult for generator to fit the variance of real data. For example, if the mean of data is not zero, and we use batchnorm and tanh in the last layer of G, then it will never match the true data distribution.
  • Use ReLU activation in generator for all layers except for the output, which uses tanh or sigmoid.
    • Depends on the range of real data.
  • Use LeakyReLU activation in the discriminator for all layers.
    • LeakyReLu is recommened by AllConvNet approach for faster training.


  • In the following code, we
    1. design the model architecture following suggestion proposed in dcgan.
    2. initialize DCGAN and train on the MNIST dataset.
In [3]:
# Load images, discard labels
(train_images, _), (test_images, _) = tf.keras.datasets.mnist.load_data()

iTrain = train_images.reshape(-1, 28, 28, 1).astype(np.float32)

# Normalizing the images to the range of [0., 1.]
iTrain = iTrain / 255.0

dsTrain = tf.data.Dataset.from_tensor_slices(iTrain).shuffle(BUF).batch(BATCH_SIZE, drop_remainder=True)

# Utility function
def utPuzzle(imgs, row, col, path=None):
    h, w, c = imgs[0].shape
    out = np.zeros((h * row, w * col, c), np.uint8)
    for n, img in enumerate(imgs):
        j, i = divmod(n, col)
        out[j * h : (j + 1) * h, i * w : (i + 1) * w, :] = img
    if path is not None : imageio.imwrite(path, out)
    return out
  
def utMakeGif(imgs, fname, duration):
    n = float(len(imgs)) / duration
    clip = mpy.VideoClip(lambda t : imgs[int(n * t)], duration = duration)
    clip.write_gif(fname, fps = n)
In [4]:
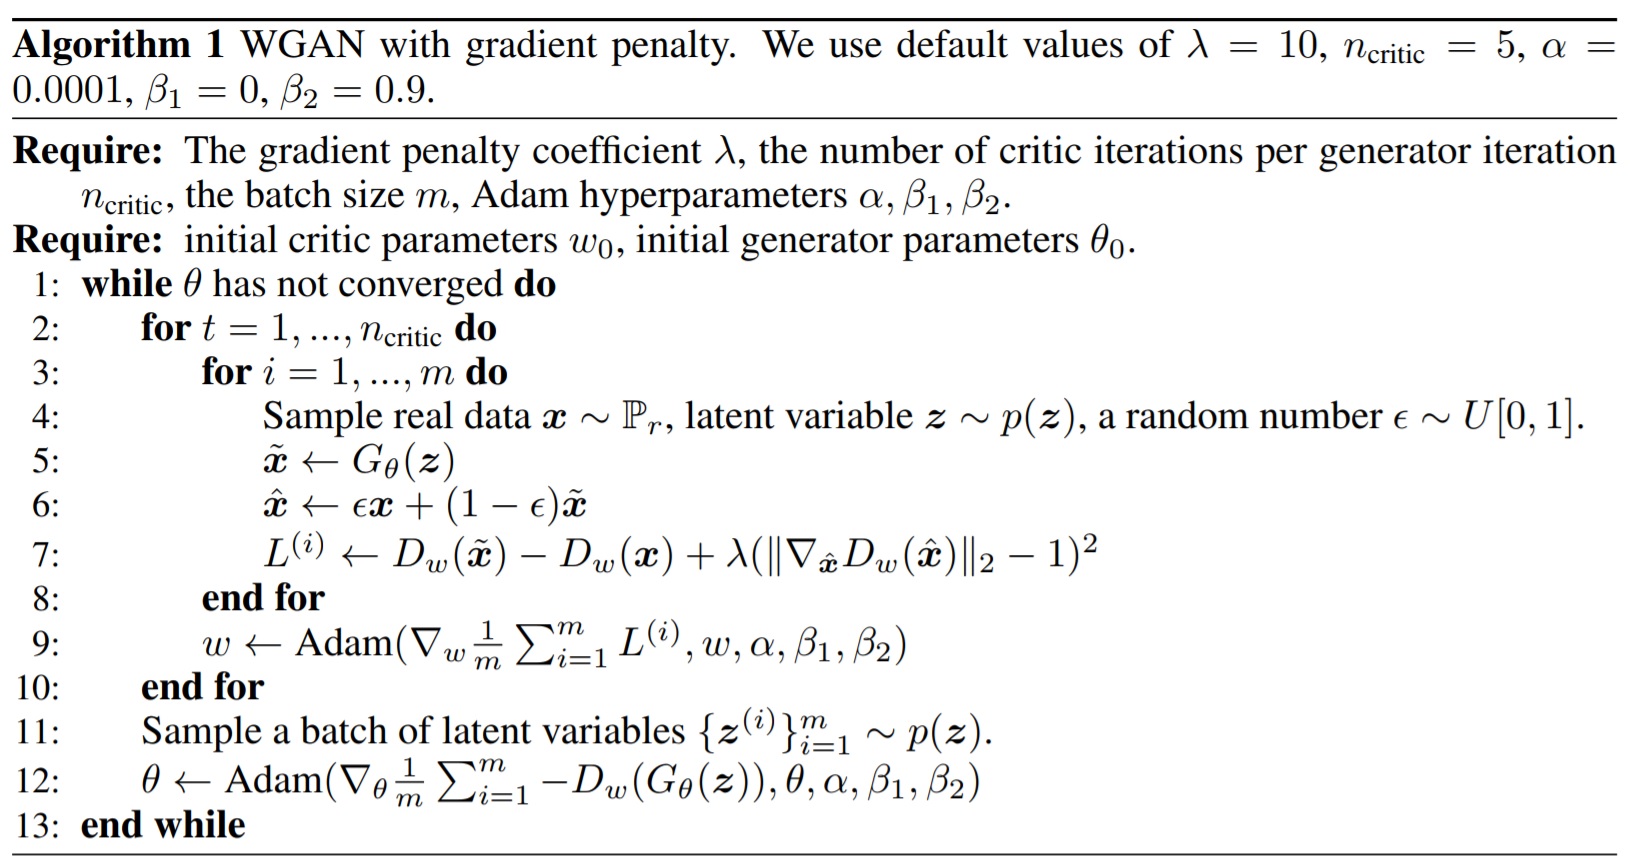
def GAN(img_shape, z_dim):
    # x-shape
    xh, xw, xc = img_shape
    # z-shape
    zh = xh // 4
    zw = xw // 4
        
    # return Generator and Discriminator
    return keras.Sequential([ # Generator
        keras.layers.Dense(units  =  1024, input_shape = (z_dim,)),
        keras.layers.BatchNormalization(),
        keras.layers.ReLU(),
        keras.layers.Dense(units  =  zh * zw << 8), # zh * zw * 256
        keras.layers.BatchNormalization(),
        keras.layers.ReLU(),
        keras.layers.Reshape(target_shape = (zh, zw, 256)),
        keras.layers.Conv2DTranspose(
            filters = 32,
            kernel_size = 5,
            strides = 2,
            padding = "SAME"
        ),
        keras.layers.BatchNormalization(),
        keras.layers.ReLU(),
        keras.layers.Conv2DTranspose(
            filters = xc,
            kernel_size = 5,
            strides = 2,
            padding = "SAME",
            activation = keras.activations.sigmoid
        ),
    ]), keras.Sequential([ # Discriminator
        keras.layers.Conv2D(
            filters = 32,
            kernel_size = 5,
            strides = (2, 2),
            padding = "SAME",
            input_shape = img_shape,
        ),
        keras.layers.LeakyReLU(),
        keras.layers.Conv2D(
            filters = 128,
            kernel_size = 5,
            strides = (2, 2),
            padding = "SAME"
        ),
        keras.layers.BatchNormalization(),
        keras.layers.LeakyReLU(),
        keras.layers.Flatten(),
        keras.layers.Dense(units  =  1024),
        keras.layers.BatchNormalization(),
        keras.layers.LeakyReLU(),
        keras.layers.Dense(units  =  1),
    ])

s = tf.random.normal([SAMPLE_NUM, Z_DIM])
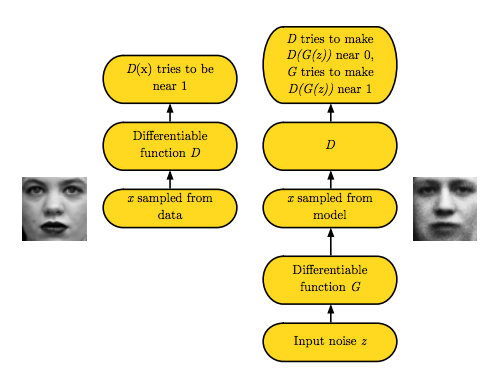
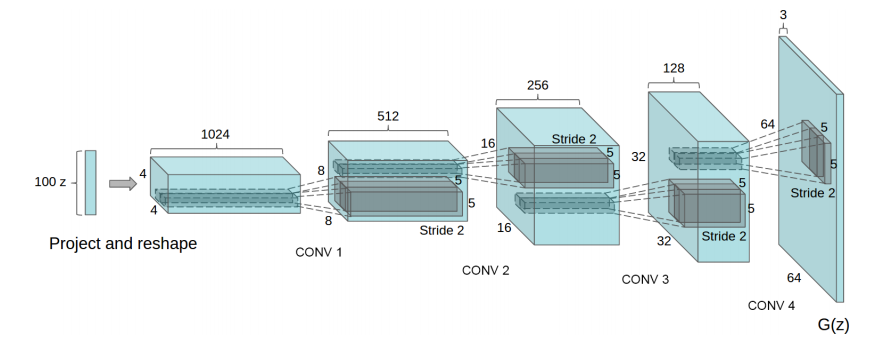
In [5]:
DC_G, DC_D = GAN(IMG_SHAPE, Z_DIM)
optimizer_g = keras.optimizers.Adam(DC_LR)
optimizer_d = keras.optimizers.Adam(DC_LR)

cross_entropy = keras.losses.BinaryCrossentropy(from_logits = True)

def DC_G_Loss(c0):
    """
    c0: logits of fake images
    """
    return cross_entropy(tf.ones_like(c0), c0)

def DC_D_Loss(c0, c1):
    """
    c0: logits of fake images
    c1: logits of real images
    """
    l1 = cross_entropy(tf.ones_like(c1), c1)
    l0 = cross_entropy(tf.zeros_like(c0), c0)
    return l1 + l0

@tf.function
def DC_D_Train(c1):
    z = tf.random.normal(BZ)

    with tf.GradientTape() as tp:
        c0 = DC_G(z, training = True)

        z0 = DC_D(c0, training = True)
        z1 = DC_D(c1, training = True)

        lg = DC_G_Loss(z0)
        ld = DC_D_Loss(z0, z1)

    gradient_d = tp.gradient(ld, DC_D.trainable_variables)

    optimizer_d.apply_gradients(zip(gradient_d, DC_D.trainable_variables))
    
    return lg, ld

@tf.function
def DC_G_Train(c1):
    z = tf.random.normal(BZ)

    with tf.GradientTape() as tp:
        c0 = DC_G(z, training = True)

       
        z1 = DC_D(c1, training = True)
        z0 = DC_D(c0, training = True)

        lg = DC_G_Loss(z0)
        ld = DC_D_Loss(z0, z1)

    gradient_g = tp.gradient(lg, DC_G.trainable_variables)

    optimizer_g.apply_gradients(zip(gradient_g, DC_G.trainable_variables))
    
    return lg, ld
In [6]:
# ratio of training step D:G = 5:1
DCTrain = (
    DC_D_Train,
    DC_D_Train,
    DC_D_Train,
    DC_D_Train,
    DC_D_Train,
    DC_G_Train
)

DCCritic = len(DCTrain)

Let's plot the generated images right after the initialization. It's good to check if there are any unexpacted artifacts in it. For case of DCGAN, we should see checkboard effect in our generated samples if we use fully convolutional layers. As mentioned in this blog post, this will introduce some checkboard effect. If the training is succeed, then this effect can be largely reduced. The blog post used upsampling to replace strided deconvolution in generator. This can cancell off the checkboard effect but have more blury result.

In the following cell, we also plot the original MNIST dataset.

In [7]:
print("Generator Initial Output :")
c0 = DC_G(tf.random.normal((1, Z_DIM)), training = False)
plt.imshow((c0[0, :, :, 0] * 255.0).numpy().astype(np.uint8), cmap = "gray")
plt.axis("off")
plt.show()
print("Discriminator Initial Output : %E" % DC_D(c0).numpy())
Generator Initial Output :
Discriminator Initial Output : -8.492252E-03
In [8]:
dc_lg = [None] * DC_EPOCH #record loss of g for each epoch
dc_ld = [None] * DC_EPOCH #record loss of d for each epoch
dc_sp = [None] * DC_EPOCH #record sample images for each epoch

rsTrain = float(BATCH_SIZE) / float(len(iTrain))
ctr = 0
for ep in range(DC_EPOCH):
    loss_g_t = 0.0
    loss_d_t = 0.0
    for batch in dsTrain:
        loss_g, loss_d = DCTrain[ctr](batch)
        ctr += 1
        loss_g_t += loss_g.numpy()
        loss_d_t += loss_d.numpy()
        if ctr == DCCritic : ctr = 0
    dc_lg[ep] = loss_g_t * rsTrain
    dc_ld[ep] = loss_d_t * rsTrain
    
    out = DC_G(s, training = False)
    img = utPuzzle(
        (out * 255.0).numpy().astype(np.uint8),
        SAMPLE_COL,
        SAMPLE_ROW,
        "imgs/dc_%04d.png" % ep
    )
    dc_sp[ep] = img
    if (ep + 1) % 32 == 0:
        plt.imshow(img[..., 0], cmap = "gray")
        plt.axis("off")
        plt.title("Epoch %d" % ep)
        plt.show()
In [9]:
utMakeGif(np.array(dc_sp), "imgs/dcgan.gif", duration = 2)
MoviePy - Building file imgs/dcgan.gif with imageio.
                                                                                                                         

SegmentLocal

We plot the training loss of discriminator and generator. We can see that we can't tell the model has converged or not from the training loss. Both curves oscillate at certain levels and it's independent with the quality of the generated images. So in practice, we plot the generated samples to monitor the training process. And due to this inconvenience, there are some works proposed in 2017 tried to solved it.

In [10]:
plt.plot(range(DC_EPOCH), dc_ld, color = "blue", label = "Discriminator Loss")
plt.plot(range(DC_EPOCH), dc_lg, color = "red",  label = "Generator Loss")
plt.legend(loc = "upper right")
plt.xlabel("Epochs")
plt.ylabel("Loss")
plt.title("DCGAN Training Loss")
plt.show()

Wasserstein GAN


There are some theoretical deficiencies in vanilla GAN. Wasserstein GAN (WGAN) was proposed to solve these problems. Apart from the original paper, this and this may help you understand the motivation of WGAN. We'll skip the theory in this tutorial and jump directly to the implementation. From the engineering perspective, the following are modification compared with origin GAN.

  • Do not apply sigmoid function to the last layer for the critic.
  • Do not apply logarithmic function to the generator loss and critic loss.
  • Training critic multiple iterations per generator iteration.
  • Using RMSProp as the optimizer, instead of momentum related optimizer like Adam. Here is a blog overview of gradient descent optimization algorithm.
  • Applying weight clipping in the critic network.

Details of the algorithm are shown below.

In [11]:
WG, WD = GAN(IMG_SHAPE, Z_DIM)
optimizer_g = keras.optimizers.RMSprop(W_LR)
optimizer_d = keras.optimizers.RMSprop(W_LR)

@tf.function
def WGTrain(c1):
    z = tf.random.normal(BZ)

    with tf.GradientTape() as tpg:
        c0 = WG(z, training = True)

        z1 = WD(c1, training = True)
        z0 = WD(c0, training = True)

        ld = tf.reduce_mean(z0)
        lg = - ld
        ld = ld - tf.reduce_mean(z1)

    gradient_g = tpg.gradient(lg, WG.trainable_variables)

    optimizer_g.apply_gradients(zip(gradient_g, WG.trainable_variables))
    
    return lg, ld

@tf.function
def WDTrain(c1):
    z = tf.random.normal(BZ)

    with tf.GradientTape() as tpd:
        c0 = WG(z, training = True)

        z1 = WD(c1, training = True)
        z0 = WD(c0, training = True)

        ld = tf.reduce_mean(z0)
        lg = - ld
        ld = ld - tf.reduce_mean(z1)

    gradient_d = tpd.gradient(ld, WD.trainable_variables)

    optimizer_d.apply_gradients(zip(gradient_d, WD.trainable_variables))
    # clipping
    for v in WD.trainable_variables: 
        v.assign(tf.clip_by_value(v, WClipLo, WClipHi))
    
    return lg, ld
In [12]:
WTrain = (
    WDTrain,
    WDTrain,
    WDTrain,
    WDTrain,
    WDTrain,
    WGTrain
)

WCritic = len(WTrain)

Then we train the WGAN and visualize the training as before.

In [13]:
wlg = [None] * W_EPOCH #record loss of g for each epoch
wld = [None] * W_EPOCH #record loss of d for each epoch
wsp = [None] * W_EPOCH #record sample images for each epoch

rsTrain = float(BATCH_SIZE) / float(len(iTrain))
ctr = 0
for ep in range(W_EPOCH):
    lgt = 0.0
    ldt = 0.0
    for c1 in dsTrain:
        lg, ld = WTrain[ctr](c1)
        ctr += 1
        lgt += lg.numpy()
        ldt += ld.numpy()
        if ctr == WCritic : ctr = 0
    wlg[ep] = lgt * rsTrain
    wld[ep] = ldt * rsTrain
    
    out = WG(s, training = False)
    img = utPuzzle(
        (out * 255.0).numpy().astype(np.uint8),
        SAMPLE_COL,
        SAMPLE_ROW,
        "imgs/w_%04d.png" % ep
    )
    wsp[ep] = img
    if (ep+1) % 32 == 0:
        
        plt.imshow(img[..., 0], cmap = "gray")
        plt.axis("off")
        plt.title("Epoch %d" % ep)
        plt.show()
In [14]:
utMakeGif(np.array(wsp), "imgs/wgan.gif", duration = 2)
MoviePy - Building file imgs/wgan.gif with imageio.
                                                                                                                         

SegmentLocal

In [15]:
plt.plot(range(W_EPOCH), wld, color = "blue", label = "Discriminator Loss")
plt.plot(range(W_EPOCH), wlg, color = "red", label = "Generator Loss")
plt.legend(loc = "upper right")
plt.xlabel("Epochs")
plt.ylabel("Loss")
plt.title("WGAN Training Loss")
plt.show()

Improved WGAN


Although Wasserstein GAN (WGAN) made progress toward stable training of GANs, still fail to converge in some settings. In this lab, you are required to implement Improved Wasserstein GANs, which is a milestone for GANs research.

We will show the training result of Improved WGAN below, which indicates that, compared to WGAN, Improved WGAN has a much better performance. It generates recognizable digits much faster during the training process.

Details of the algorithm are shown below.

SegmentLocal

Assignment

  1. Implement the Improved WGAN.
  2. Train the Improved WGAN on CelebA dataset. Build dataset that read and resize images to 64 x 64 for training.
  3. Show a gif of generated samples (at least 8 x 8) to demonstrate the training process and show the best generated sample(s). Please upload to your Google drive and share the link.
  4. Draw the loss curve of discriminator and generator during training process into one image.
  5. Write a brief report about what you have done.

Notification

  • Upload the notebook named Lab13_{strudent_id}.ipynb to demonstrate your codes and report on google drive, then submit the link to eeclass.
  • The deadline will be 2022/12/14 23:59.
In [ ]: